Python Environment Setup (Anaconda)
Anaconda is an easy-to-install and free Python/R software distribution with a collection of 7,500+ open source packages (including R). When you install Anaconda, over 250 packages are automatically installed along with Python. If you do not want to have pre-installed packages, an alternative is to choose Miniconda that ships you only Python, conda (package&environment manager) and their dependencies.
Glossary:
- Software distribution: a pre-built and pre-configured binary code that can be installed and run on a specific system. For instance, .exe file is an executable (software distribution) on Windows OS. The equivalent of .exe on Mac is a.app file.
- Packages: They are nothing but directories containing code files, either in binary or source code formats, which exposes functions and variables.
- Python Package Manager (Package&Environment management system): a tool designed to automate the process of installing, upgrading, removing and building packages. Packages always have complicated dependencies, meaning oftentimes they are built upon other sets of packages. Without a package manager, you find yourself in a situation where you have to install all the prerequisites in order to get one package running. What is more terrifying is the installation order matters. In Anaconda, conda is the package manager. In addition, conda can also manage Python environments.
- Conda: the package & environment manager in Anaconda ecosystem.
System Requirement:
- Operating System: Windows 7 or newer, 64-bit macOS 10.10+, or Linux including Ubuntu, RedHat, CentOS 6+, and others
- Disk Space: 5+ GB
Installation
Installing Anaconda on Windows
- Download the Anaconda installer
- Double-click the installer to launch the installation.
- When asked "Install for Just me or All Users", please choose "Just Me (recommended)".

- Change the destination folder if you want (Hint: You might run into some problems changing the folder if you do not want admin privileges)
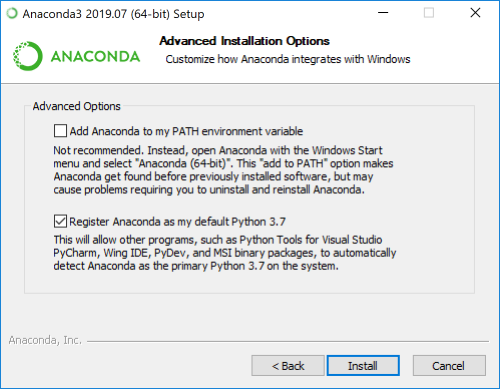
- In "Advanced Installation Options" windows, uncheck "Add Anaconda to my PATH environment variable" and check "Register Anaconda as my default Python 3." (Hint: This is the default settings. If you accidentally checked the option "Add Anaconda3 to my PATH environment variable", other programs installed on your computer might fail to work if they have their own Python dependencies. )
- Click the Install button to complete the installation. (Tip: 3 ~ 5 mins)
- Once installed, go to the Windows Start to see whether Anaconda folder is listed.

Installing Anaconda on MacOS
- Download the Anaconda Installer
- Double-click the .pkg file and complete the installation.
- Once installed, go to Launchpad and click Anaconda-Navigator program. If the Anaconda-Navigator icon does not show up, simply search it.

Exploring Anaconda Suite
- Anaconda Navigator
- Anaconda PowerShell/Prompt (The alternative on Mac is Terminal.)
- Jupyter Notebook
- Spyder (which is a Python IDE (Integrated Development Environment). Not covered in this course)
Anaconda Navigator
Anaconda Navigator is a desktop program that is bundled with Anaconda distribution. It provides a user-friendly interface for users to manage packages, environments and channels, without bothering to use terrifying command lines.
Windows Users: Start Menu -> find and click Anaconda Navigator(Anaconda3) icon.
Mac Users: Open LaunchPad and click Anaconda-Navigator icon.
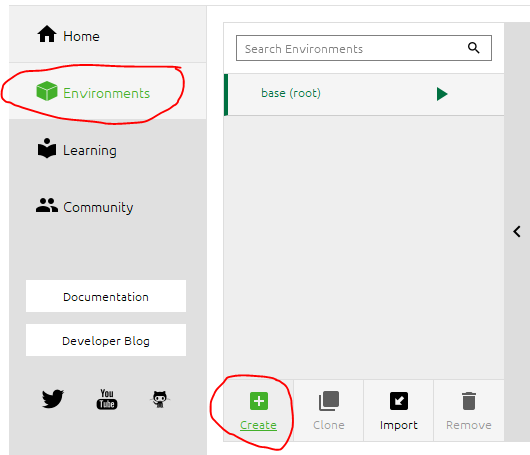
The leftmost panel of Navigator shows the main things which you can do, that is,
- Home: where you can install or launch other applications
- Environments: where you can mange Python environments & packages. The possible actions include (1) environments: creation, deletion, activation, deactivation, importing, exporting. (2) packages: installation, updating, removing, searching.
- Learning: where you can find learning resources
- Community: where you can engage with Python communities.

Channel: is an online repository where Anaconda goes to to fetch packages. E.g., one of the biggest channel is conda-forge.
Environments
Environment is a mechanism used to create isolated package settings. You might have heard of "virtual environment" in Python community. Anaconda environment is essentially a replacement and upgrade to the virtualenv of Python, which offers more features and are easier to understand. It is is extremely useful when you manage multiple Python projects that have different package requirements. E.g., one project requires Python 2.x whereas the other is built upon Python 3.x.

Create a new Environment
- Click the Environment tab of the leftmost panel -> then click the Create button.
Create a new Python environment named "workshop", and choose select 3.8 (the latest release). (Hint: The Location on the dialog tells you where this new environment is located at on your computer. )

Once the new environment is initialized successfully, a new environment appears under the base(root) in the middle panel. The right arrow indicts that the newly created environment is activated.
- Switch between the base and the workshop envs to see what is the biggest difference?
Clone an Environment
Cloning allows you to create a new environment (copy) from an existing environment. 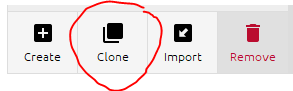
Import an Environment
Unlike the cloning that creates a copy from an existing environment on your computer, importing an environment enables you to create a new environment from an environment configuration file (.yml file)
Think of a scenario where you start a new collaboration with your colleagues on a Python project. Unlike your own Python settings (3.8), they use Python 2.x and the project requires very complicated package dependencies. In order to run their code with no errors, the best solution is to set up an environment exactly the same as theirs. You could simply ask your colleagues to export their environment to a YAML file and share it with you.
Exercises:
- Go to the Github page of Psychopy (a behavioral science Package)
- Navigate to
psychopy/conda/psychopy-env.yml - Click the Raw button to get directed to the raw file page.


Save the YML file to your computer.
Mac Users: right-click the page-> Click Save Page As -> remove the extension
.txt& keep the format asPage Source->Save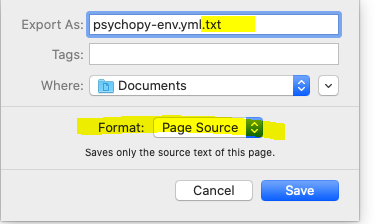
Windows Users: right-click the page-> Click Save as... -> remove the extension
.txt-> Save
Import

Packages
Install Packages:
- stay with the new environment - workshop. In the package panel, switch to
Not installedfrom the dropdown menu. The default view shows a list of installed packages residing in this environment.
Type
Pandasin the search window. You should see 9 packages matching "pandas". (Hint: if no packages return, clickUpdate index...next to the search window. This will update the package list of your computer)Check the pakage
pandasand clickApplybutton down below.- The
Install Packagesdialog prompts, showing 12 packages will be installed. Wait!? I just want to install one package. How come Anaconda installs 12 packages for me? --Package dependencies. - Hit
Applyto proceed. - Switch back to the
Installedview and remove the words you typed in the search box to see the changes.
Remove/Update Packages
- Stay with the
Installedview. - Left-click the checkbox of a certain package.
- Form the prompt, choose to either update or remove this package.

- Hit the
Applybutton down below.
Channels
Add Channels
- Click the
Channelsbutton on the top. - Click
Add...button. - Type
https://conda.anaconda.org/conda-forge/into the white area and hit Enter. (Hint: conda-forge documentation) - Hit the
Update channelsbutton to proceed.
Question: How am I able to know the channel names? -- Explore the Anaconda Cloud. Anaconda Cloud is where data scientists share their work. You can search and download popular Python and R packages and notebooks to jumpstart your data science work.
Anaconda Prompt & PowerShell (conda)
Anaconda Prompt & PowerShell are two command-line interfaces (CLI) that come with the installation of Anaconda. To be exact, Anaconda did not install those two tools. Those two tools belong to the Windows OS. Anaconda just configured the environments of the CLI so that when you type a conda command, the shells know how to respond. CLI is also known as terminal or shell in Mac or Linux world, in which you communicate with OS through commands.
This section does not aim to teach you the Windows- or Mac- internal commands. Instead, you will learn conda commands to manager environments and packages. All the operations you have done in the Anaconda Navigator will be unified in here.
Mac users: Go to Anaconda-Navigator -> left-click the environment you work with (e.g., the base(root)) -> Choose Open Terminal 
Windows Users: Go to Windows's Start menu -> Click either Anaconda Powershell Prompt(anaconda3) or Anaconda Prompt(anaconda3). 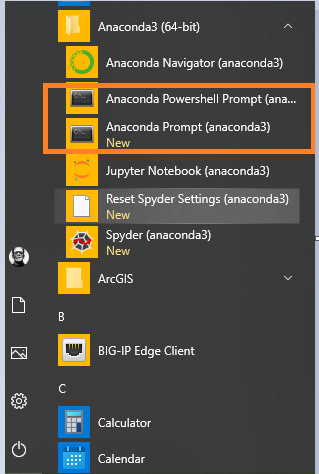
Resources 1. conda command reference 2. conda cheat sheet
Environments
Create Environments:
conda create or conda env create
- create a new environment:
conda create --name workshop2 - create a new environment and install a list of packages:
conda create --name workshop2 python pandas(Hint: you can append as many packages as possible) - create a new environment and install packages at required versions.
conda create --name workshop3 python=3.7 pandas - create a new environment from a YML file:
conda env create --name workshop5 --file xxx.yml(Hint: this command works only when the xxx.yml is under the current working directory. If not, you need to pass in the full path to the yml file. )
Remove Environments: conda env remove
- remove an environment:
conda env remove --name workshop2
Switch between Environments: Activate & Deactivate
conda activate, conda deactivate
- Activate an environment:
conda activate workshop2(Hint: this command deactivates the current working environment and activate the target environment) - Deactivate the current working environment:
conda deactivate(Hint: this command deactivates the current working environment and gets you back to the base/root environment.)
Share Environments:
conda env export >
- Export the current working environment to a YML file:
conda env export > myenv.yml(Hint: What if I want to export another environment? -- Activate that environment first)
Packages
List all the Packages:
conda list
- list all the installed packages under the current active environment:
conda list - list all the installed packages under a certain environment:
conda list --name workshop2 - list (check) specific packages:
conda list pkgname(Hint: Replace pkgname with a package name. This command list only the package info of that specified package. As you can tell, this command can also help if a package is installed or not.)
Install packages:
conda install
- Install a package in the current active environment:
conda install pkgname(Hint: replace the pkgname with a package name) - Install a package at a certain version:
conda install pkgname=1.2 - Install a package to a target environment:
conda install --name workshp2 pkgname - Install a package from a certain channel:
conda install --channel chnname pkgname(Hint: reaplce chnname with a channel name, e.g., conda-forge)
Remove Pakcages:
conda remove
Note that when remving/uninstalling a package, all the packages that depend on that package will be removed as well. 
- Remove a package from the current active environment:
conda remove pkgname - remove a list of packages at once:
conda remove pkg1 pkg2 pkg3 - remove all the packages in the current active environment:
conda remove --all - remove a package without checking the dependencies (DANGEROUS):
conda remove pkgname --force
Update Packages
conda update
- Update a package in the current active environment:
conda udpate pkgname - update a list of packages at once:
conda update pkg1 pkg2 pkg3 - Update all packages:
conda update --all - update a package from another environment:
conda update --name envname pkgname
Search for Packages (NOT COMMON)
conda search
- Search for packages:
conda search pkgname - fuzzy-search for packages:
conda search "pkg"(Hint: this command searches for packages containing "pkg")
Jupyter Notebook
Jupyter Notebook is an open-source browser-based application. It provides an interactive computing environment where users can put live code, narrative text, equations, images, videos and even widgets in one single place. This nature of interactivity redefines "programming" and makes learning Python engaging and fun.
Jupyter is a loose acronym for programming languages of Julia, Python and R that are the 3 languages Jupyter project supported in the first place. Today, however Jupyter Notebook can support over 40 programming languages. Here is a full list of supported languages.
Open Jupyter Notebook
Windows users: Open up Anaconda Powershell, and type the command: jupyter notebook (Note: Do not close the terminal window, as it plays as a tunnel to communicate between the front-end Browser and the back-end Kernel.)
Mac Users: Open up Anaconda-Navigator -> Click the Environments tab -> left-click the base environment -> choose Open with Jupyter Notebook
Create a new Notebook document
- Navigate to your working directory. Click the
Newbutton on the top-right corner, and choose Python 3.
- Once you are in the new notebook document, the first thing you do is to name your notebook. (Hint: the default name is
Untitled)
- Explore the interface.

Structure of a Notebook Document
Cells
The notebook is comprised of a sequence of cells. A cell is a multi-line text input area, and it can be executed. There are 3 types of cells:
- code cells, where the source code goes. All the code written here are evaluated by Python interpreter. In other words, Python syntax has been strictly followed in here. This is the default type for a new cell.
- markdown cells, where annotations (non-Python) go. The examples can be text, images, videos and so on. You can take markdown cells as note-taking areas. With Markdown language (a light-weight markup language), you can format plain-text elements. This overview explains how the Markdown language works and why it is one of the most popular markup languages.
- raw cells: defined as content that should be included unmodified.

Modes
When a cell is focused, there are two modes associated with it: command mode and edit mode.
- In edit mode, you edit the content, either code or annotations, in the cell. Hit the
Enterkey to get to the edit mode. - In command mode, you perform actions onto the cells. Hit the
Esckey to get to the command mode. The possible actions include:- Execute the cell: press
Shift+Enter - Turn a code cell to a Markdown cell: press
m - Turn a Markdown cell back to a code cell: press
y - Delete the cell: Hit
dtwice quickly
- Execute the cell: press
More shortcuts can be found from the keyboard icon from the toolbar. 